If you’re thinking of creating a community for your business, you’re in the right place!
Facebook isn’t just about sharing your favorite cat videos anymore. It’s grown into a powerhouse for creating communities and promoting businesses, just like its siblings, Instagram and YouTube.
Here’s a mind-blowing stat: every month, 1.8 billion people engage in tens of millions of Facebook Groups.
That’s a lot, right?
If you’re looking to connect with folks who share your interests, want to spread the word about valuable resources, or grow your brand organically, starting a Facebook Group could be your golden ticket.
So, grab a coffee, sit back, and let’s dive into the ins and outs of creating a Facebook Group together, one step at a time.
How to Create a Facebook Group
Step 1 : Go to the “Groups” section in the left menu
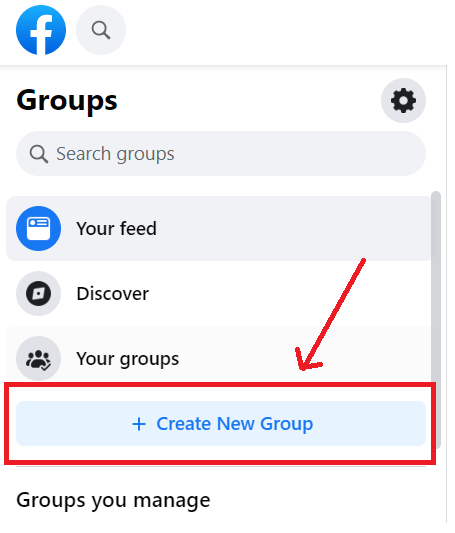
Step 2: Click “Create New Group”
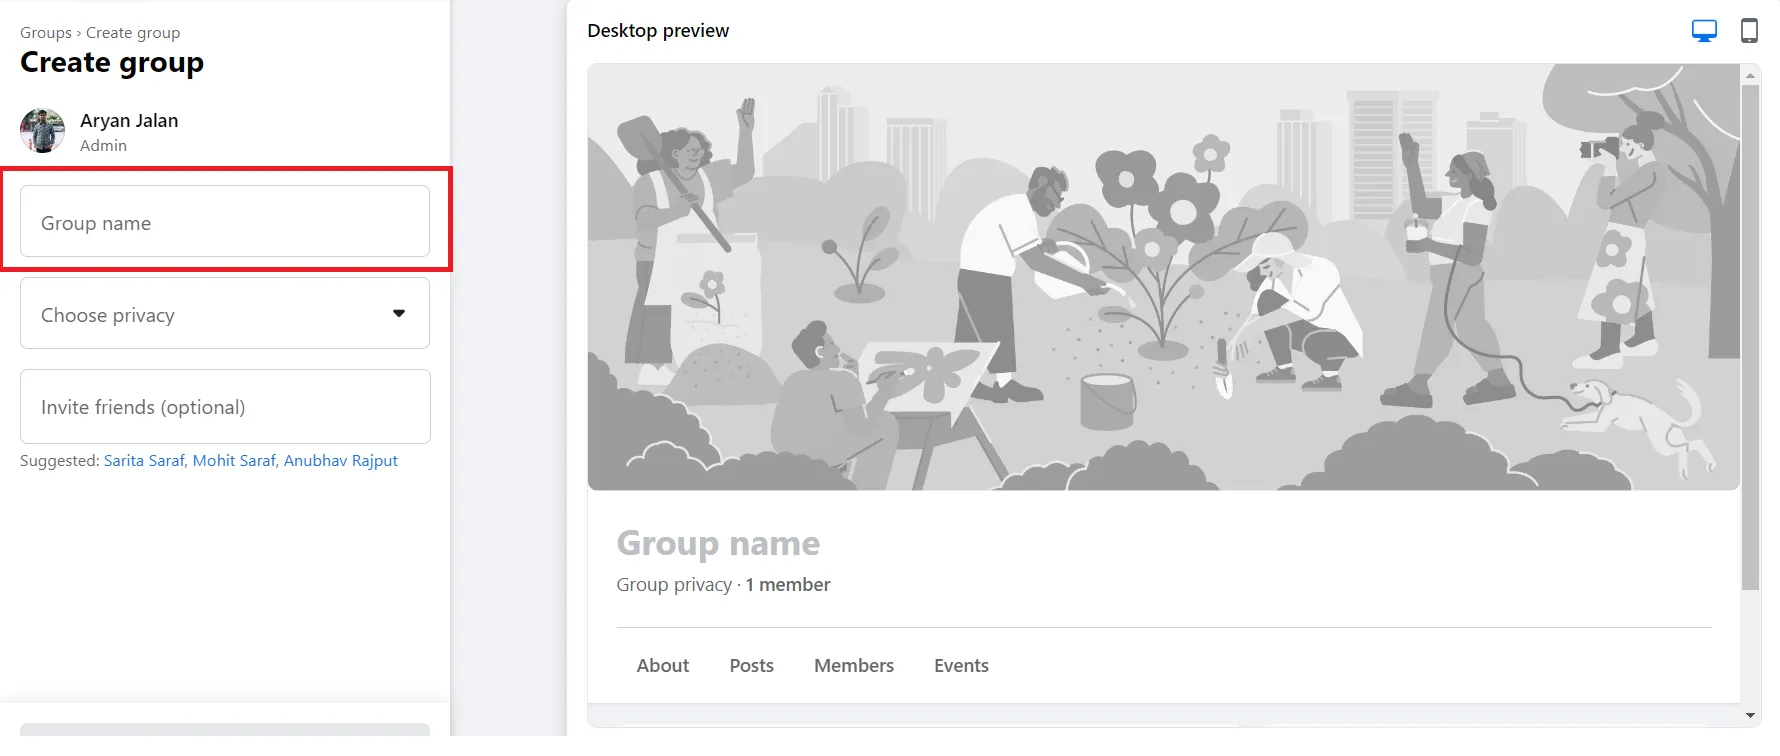
Step 3: Enter a group name that reflects its purpose
Step 4: Choose a group type (Public, Private, or Hidden)
Step 5: Set the privacy settings
Step 6: Add a description and cover photo.
Detailed Steps to Set Up Your Group
- Navigate to Facebook and find the ‘Groups’ tab in the left menu. If it’s not visible, click ‘See more’ to expand the options.

- Click ‘Create New Group’ to begin the setup process.
- Time to name your group. Give it a name that reflects its purpose and grabs attention.
- Pick your group type next. Decide if your group will be Public (visible to everyone), Private (members-only access), or Hidden (invite-only).
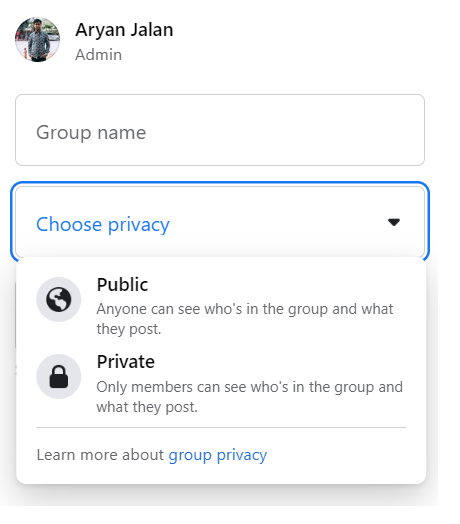
- Choose the right privacy setting to ensure the group aligns with your goals—whether for open discussions or a more exclusive community.
- Finally, add a group description and a cover photo. These are essential for setting the right expectations for potential members.

Voila! Your Facebook group is all set. But we’re not done yet. Let’s dive a little deeper.
How to Create a Private Group on Facebook
Maybe your group calls for a little more privacy. That’s great too! Here’s how to create a private Facebook group:
- Follow the initial steps above – navigate to ‘Groups’, click ‘Create new group’, and give your group a name.
- When choosing your group type, select ‘Private’. This ensures that only members can see who’s in the group and what they post.

- Now, you can decide if your group should be ‘Visible’ (findable by search) or ‘Hidden’ (only accessible via a link).

- Add people to your group and click ‘Create’. And there you have it – your private Facebook sanctuary is ready!
How to Create a Facebook Group for an Organization
A dedicated Facebook group for your organization isn’t just about having another social media presence. It’s about fostering increased engagement, improving internal communication, and enhancing collaboration among team members. It’s about building a community around your brand, a space where ideas flourish, and relationships grow.
How to Set Up a Group Linked to Your Organization’s Facebook Page
Ready to extend your organization’s reach and build that community we talked about? Here’s how you can create a group directly linked to your organization’s Facebook page:
- Click on your “Profile Image” on right top side
- Now a pop-up appears like the below image, and click on “See all profiles”
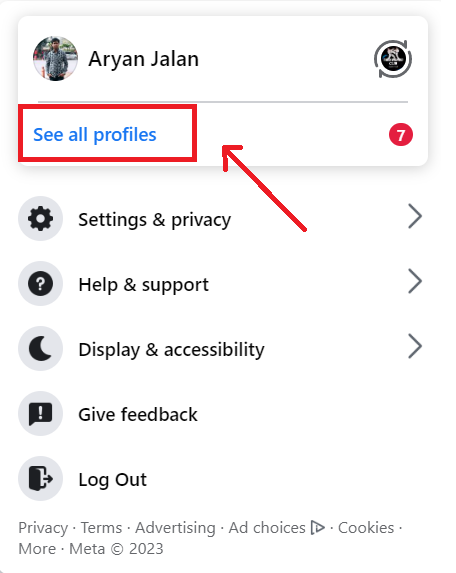
- Now, switch your profile to the organization’s profile
- And then switch to home page
- Follow the steps for group creation as mentioned earlier – name your group, select the group type, add a description, and choose a privacy setting that fits your organization’s needs.
- Navigate to your organization’s Facebook page.
- Find and select ‘Groups’ from the left-hand menu.
- Click ‘Create Linked Group’.
There you go! You now have a group seamlessly integrated with your organization’s Facebook page, making management a breeze. So go ahead, and start fostering that vibrant community around your brand!
How To Choose the Right Privacy Setting for Your Group
Remember Step 5? we mentioned about ‘choosing the right privacy setting’. Picking one can be a head-scratcher. But don’t worry, we’re here to make it simple.
If your goal is to attract a wide audience, share openly, and spark public discussions, go with a Public Group. Imagine you’re running a local hobby club – you’d want as many enthusiasts as possible to join in, right?
A Private Group is your best bet if you want a more controlled space where only approved members can join and post. Think about a school parent-teacher group where only the relevant folks should be part of the conversation.
And choose a Secret Group if you’re after a super-exclusive space for very private discussions. Picture a private mastermind group where discussions need to stay confidential.
The key takeaway? Consider your group’s purpose, your target audience, and how much privacy you want. You’ll land on the perfect setting for your unique needs!
Three Types of Facebook Groups
Now that you know how to create a group, let’s explore the different types of Facebook groups and how they impact visibility and engagement.
Each one has its unique privacy settings and serves different purposes. So, let’s break it down and determine which one best fits your needs.
Public Groups
Think of Public Groups like an open house party. Anyone can drop in, see who’s there, and join the conversation. They can find your group, check out its members, and see all the posts. This is a fantastic option if you’re looking to engage with a large crowd or share content that’s open for all to see.
But remember, with a Public Group, everything you post is visible to everyone on Facebook, not just your group members, as you can see in the below example.

Private Groups
Private Groups are a bit like members-only clubs. People can find your group on Facebook, but they’ll need your OK to get in. Once they’re in, only members can see who else is in the group and what they’re posting. This is a perfect choice if you’re building a more exclusive community or if privacy is a big concern.

Secret Groups
And then we have Secret Groups, the most private option. Think of it like a hidden retreat. These groups are invisible to non-members; only members can see the posts.
In fact, Secret Groups don’t even appear in search results, and you can only join one if a current member invites you. If you need a super-private space for very exclusive or sensitive discussions, Secret Groups are your go-to.
6 Tips to Engage and Manage Your Facebook Group
Now that you’ve set up your Facebook group and chosen the right type, the next step is making it an active and thriving community.
Creating a successful group on Facebook isn’t just about numbers—it’s about meaningful interactions, engagement, and a sense of belonging. Here are six strategies to help you create a dynamic and well-managed group.
- Create a Welcoming Environment: The atmosphere within your group plays a significant role in attracting and retaining members. As the group administrator, it’s your responsibility to create a friendly and inclusive environment. Enforce the group rules firmly but fairly, and always strive to foster positive and respectful interactions among members.
- Schedule Regular Posts: Keeping your group active requires consistent content sharing. Plan and schedule regular posts to spark conversations and keep members engaged. You can use Facebook’s post scheduling feature to automate this process, ensuring a steady stream of content even when you’re busy.
- Host Live Events: Hosting live events, like Elementor’s webinar in this post, can significantly boost engagement in your Facebook group. Such events provide exclusive content and stimulate interaction and anticipation. The group fosters a sense of community by sharing insider insights and future plans.

Inviting members to join the event on multiple platforms and tagging specific members further promotes interaction. Hence, effectively communicating about live events can make members feel valued and excited, enhancing engagement.
- Recognize and Reward Active Members: People appreciate the acknowledgment of their contributions. Regularly recognizing and rewarding the most active members can boost morale and stimulate more engagement. Consider creative ways to appreciate your members, such as giving shout-outs, assigning special roles, or awarding badges.
- Facilitate Networking and Collaboration: Encourage members to connect with each other beyond the standard post comments. Facilitating networking and collaboration can add immense value to your group and make it a go-to resource for your members.
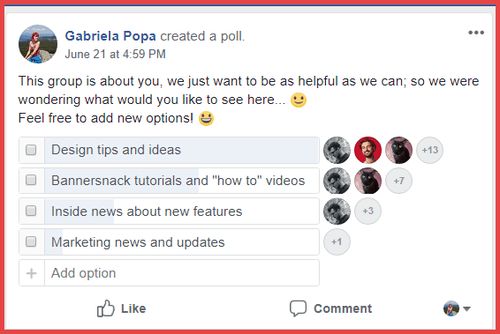
- Run Challenges, Contests, or Polls: Polls are an incredibly effective tool to foster engagement within your Facebook group. By initiating a poll like the one in our example, you’re inviting active participation and giving members a sense of influence over the group’s content direction. Allowing members to add their own options further encourages interaction, which enhances overall engagement. This is a simple yet powerful way of ensuring your group remains a vibrant, interactive space where every member feels valued.
Implementing these tips can help transform your Facebook group into a dynamic, engaged community. Remember, each group is unique, and what works for one may not work for another. It’s all about experimenting, learning from your members, and adapting to serve your group’s specific needs and goals. Happy managing!
Using Facebook Group Insights to Track Engagement
Facebook Group Insights tool is invaluable for monitoring group engagement and activity levels. It can be accessed from the left menu under the “Manage Group” section when you open your Facebook group.
Facebook Group Insights provides a plethora of useful metrics for administrators to monitor. These include:
- Active Members: This metric shows how many members are actively participating in your group. An active member is defined by Facebook as someone who has viewed, posted, commented, or reacted to a group post during the last 28 days.
- Post Engagement: This metric provides information about your group’s total number of posts, comments, and reactions over the selected period. A high level of post engagement is typically a positive sign, indicating that your content resonates with your audience and sparks conversations.
- Popular Times: This metric shows when your members are most active in the group. Understanding when your members are most likely to be online and engaged allows you to schedule your posts for these times to maximize visibility and interaction.
How to Adjust Strategies Using Facebook Group Insights
The data gathered from Facebook Group Insights can help identify areas for improvement and adjust group management strategies for better results. Here are some examples of changes that can be made based on data analysis:
- Adjusting Post Frequency: If your metrics show that posts during certain times receive more engagement, consider adjusting your post schedule to match these peak times.
- Modifying Group Rules: If you observe that certain types of posts lead to more engagement and positive interaction, consider updating your group rules to encourage more of these posts.
- Revising Content Strategies: Pay attention to the types of posts that receive the most engagement. This can guide your content strategy moving forward, encouraging more of the content types that your audience responds to most positively.
Conclusion
Creating a Facebook Group is just the first step—building an active, engaged community is where the real magic happens.
With the right approach and Facebook tools, managing your group becomes much easier, allowing you to focus on meaningful interactions and growing your community.
So, dive in, set up your group, and start fostering a space where people connect, share, and engage around a common interest.
Frequently Asked Questions
What content should I post to keep my Facebook Group engaged?
Different types of content work well for different groups. However, posts encouraging interaction, such as questions, polls, and live events, often have high engagement. Also, sharing valuable information and resources related to your group's focus can help engage members.
What is the ideal size for a Facebook Group?
The ideal size for a Facebook Group depends on its purpose. Some groups benefit from many members, while others are more effective with a smaller, more engaged community.
Can I change the privacy setting of my Facebook Group after it's been created?
Yes, you can change the privacy setting of your group after it's been created, but there are some restrictions based on the size of the group. Choosing your group's privacy setting carefully at the outset is recommended.
Can I create a Facebook Group for my organization?
Yes, you can create a Facebook Group linked to your organization's Facebook page. This can help improve internal communication, enhance collaboration among team members, and build a community around your brand.
How do I deal with inappropriate behavior or posts in my Facebook Group?
As a group admin, you can remove posts that violate your group's rules and even remove members who consistently behave inappropriately. It's important to set clear group rules and enforce them to maintain a positive and respectful environment.


